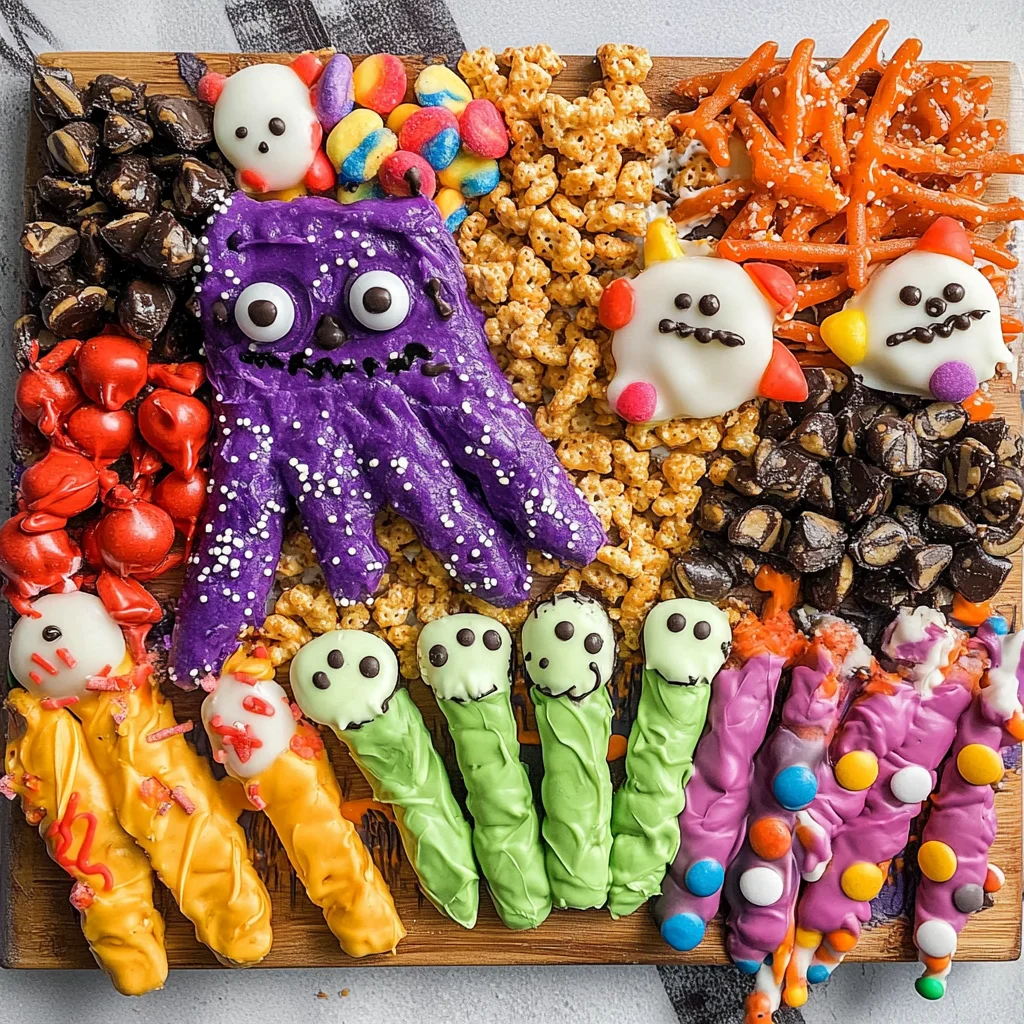
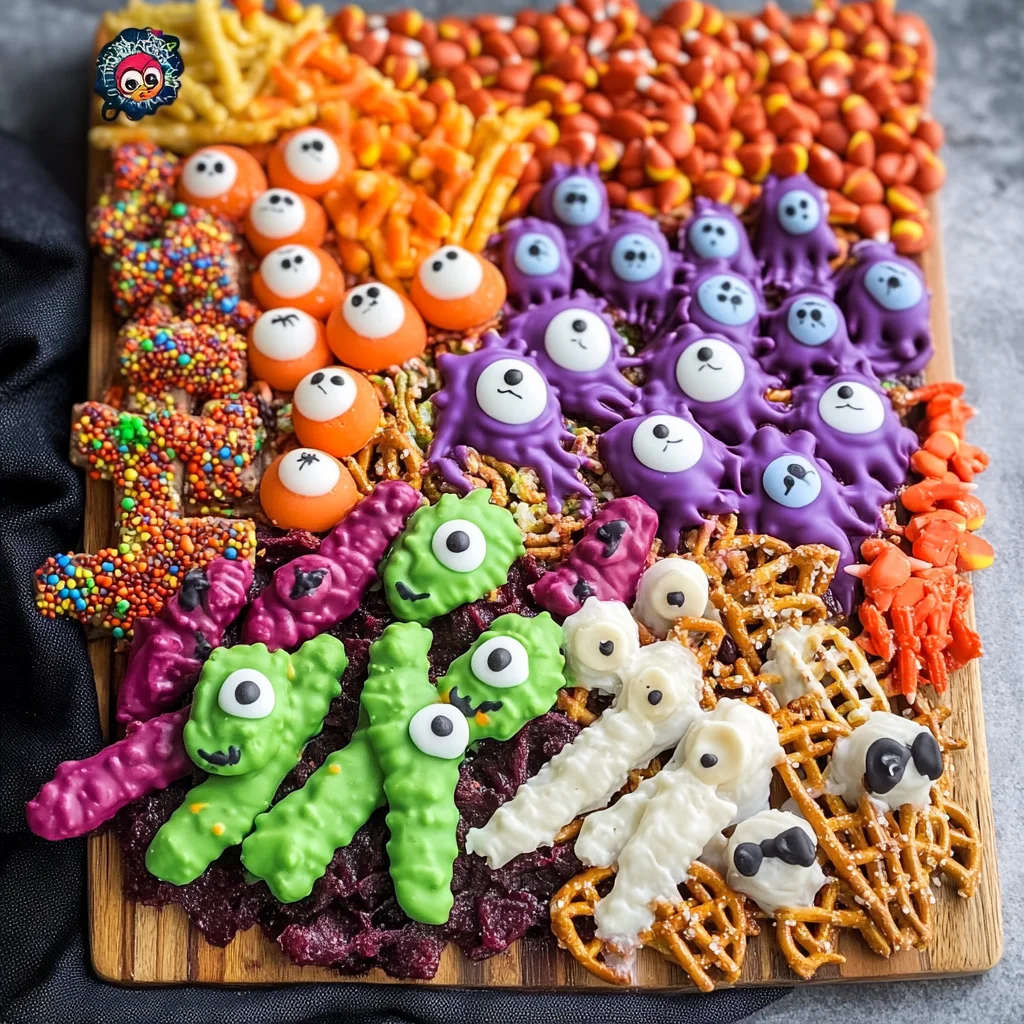
Halloween Charcuterie Board
If you’re looking for a fun and festive way to celebrate Halloween, this Halloween Charcuterie Board is just the ticket! This delightful spread is perfect for gatherings with friends and family or cozy movie nights at home. It’s packed with sweet treats, creative chocolate-dipped “creatures,” and a playful skeleton centerpiece that will surely bring smiles to everyone’s faces. The best part? It’s simple to prepare, making it a favorite for anyone who loves to entertain without all the fuss.
This recipe not only sparks creativity but also allows you to enjoy quality time together while assembling your spooky masterpiece. Plus, it’s scalable! Whether you’re hosting a big party or a small get-together, you can easily adjust the quantities. So grab your favorite candies and let’s dive into making this Halloween treat!
Why You’ll Love This Recipe
- Easy to Prepare: With straightforward steps, you can whip up this board in no time, leaving more room for fun!
- Kid-Friendly: Kids will love creating their own little monsters and ghosts; it’s a great activity to do together.
- Visually Stunning: The vibrant colors and unique shapes make this charcuterie board a feast for the eyes as well as the taste buds.
- Make-Ahead Convenience: You can prep many of the treats in advance, allowing you to relax before your guests arrive.
- Endless Fun: Mix and match ingredients based on what you have at home or what your kids like best!
Ingredients You’ll Need
Gathering simple, wholesome ingredients is half the fun! Here’s what you’ll need to bring your Halloween Charcuterie Board to life:
For the Sweet Treats
- 8 rice krispie treats
- 5 ounces white chocolate melting wafers
- purple food dye
- candy eyes
- purple sprinkles
- 8 pretzel rods
- 10 ounces white chocolate melting wafers
- green food dye
- sliced almonds
For the Creatures
- 8 Nutter Butter cookies
- 5 ounces white chocolate melting wafers
- mini chocolate chips
- 8 Mini Reese’s Cups
- 8 Oreo Thins
- candy eyes
For the Candy Fillers
- 18 ounces Smarties
- 16 ounces red licorice
- 15 ounces Assorted Hershey’s Candy
- 28 ounces sour pectin-based gummy candies
- 40 ounces candy corn
Variations
This Halloween Charcuterie Board is incredibly flexible! Feel free to get creative with different candies and treats that excite you. Here are some fun ideas:
- Add Different Candies: Swap out Smarties for M&Ms or add seasonal gummies for variety!
- Mix Up the Colors: Use orange food dye instead of purple for a classic Halloween look.
- Try Other Cookies: Use chocolate sandwich cookies instead of Nutter Butters for a different flavor twist.
- Include Fresh Fruit: Add slices of apples or grapes for a refreshing touch amidst all the sweet treats.
How to Make Halloween Charcuterie Board
Step 1: Create the Monster Treats
Start by making your Monster Treats! Melt the white chocolate wafers according to package instructions (you can use a microwave or double boiler). Once melted, mix in some purple food dye until you reach your desired shade. Dip one side of each Rice Krispie Treat into the melted chocolate, then place candy eyes on top. Finally, sprinkle purple sprinkles over them to mimic wild hair. Set these aside on parchment paper so they can firm up.
Step 2: Prepare Witch Fingers
Next up are those eerie Witch Fingers! Melt more white chocolate wafers and add green food dye. Pour this melted mixture into a tall cup for easy dipping. Carefully dip each pretzel rod in chocolate and place a sliced almond at one end—this will look just like witchy fingernails! Let them set on parchment paper.
Step 3: Make Ghostly Delights
For some adorable Ghosts, melt another batch of white chocolate wafers. Dip one side of each Nutter Butter cookie into the melted chocolate. Use two mini chocolate chips as eyes and one as a mouth—so cute! Allow these cookies to set on parchment paper too.
Step 4: Assemble Batty Bites
Now it’s time for some Bats! Unwrap Mini Reese’s Cups while keeping their inner lining intact. Open each Oreo cookie and scrape off the filling (save it!). Break each Oreo in half; these will be your bat wings. Spread some Oreo filling on top of each Reese’s Cup, attach the cookie halves as wings, and use more filling to stick candy eyes on top.
Step 5: Build Your Board
Place your skeleton diagonally across your serving board as a spooky centerpiece—stuff its rib cage with candy for extra flair! Next, arrange those larger decorated treats around it. Finally, fill all open spaces with assorted candies until everything looks delightfully colorful.
Now step back and admire your creation before sharing it with family and friends! Enjoy every treat-filled moment together with this fabulous Halloween Charcuterie Board.
Pro Tips for Making Halloween Charcuterie Board
Creating a stunning Halloween charcuterie board can be as fun as it is delicious! Here are some tips to help you craft the perfect spooky spread.
-
Choose a Variety of Textures: Incorporating both crunchy and chewy candies adds interest and makes your board more appealing to the eye and palate.
-
Use Seasonal Colors: Sticking to a Halloween color palette of blacks, oranges, purples, and greens can enhance the festive atmosphere of your board.
-
Plan Your Layout: Before placing items on the board, lay everything out to find a balance between larger treats and smaller candies, ensuring an inviting presentation.
-
Make It Interactive: Include items that guests can assemble themselves, like candy-filled skeletons or ghostly treats. This adds an element of fun and keeps everyone engaged.
-
Keep It Fresh: If you’re preparing the board in advance, consider adding perishable items closer to serving time. This will maintain freshness and prevent any sogginess.
How to Serve Halloween Charcuterie Board
Presenting your Halloween charcuterie board with flair will truly impress your guests. Whether it’s for a party or a cozy movie night, here are some ideas for how to serve this delightful dish.
Garnishes
- Fresh Herbs: Sprigs of mint or rosemary can add a pop of green and a touch of freshness that contrasts beautifully with the sweet elements.
- Edible Flowers: These not only add color but can also give a whimsical touch that fits perfectly with the Halloween theme.
- Chocolate Drizzle: A light drizzle of melted chocolate over certain treats can elevate their look and make them even more enticing.
Side Dishes
- Pumpkin Soup: A warm bowl of creamy pumpkin soup served alongside adds a savory contrast to the sweet treats of the charcuterie board.
- Veggie Platter: Include a mix of crisp vegetables like carrots, celery, and bell peppers with hummus for dipping. This offers a healthy option that balances out all that sweetness.
- Apple Slices with Nut Butter: Crisp apple slices paired with almond or sunflower seed butter provide a refreshing crunch while sticking to allergy-friendly options.
- Popcorn Mix: A bowl of spooky popcorn mix—perhaps sprinkled with Halloween-themed candies—can be a fun snack that complements the treats on the board.
With these serving suggestions and pro tips, your Halloween charcuterie board is sure to be a hit! Enjoy creating this playful masterpiece that everyone will love!
Make Ahead and Storage
This Halloween Charcuterie Board is not only fun to create but also great for meal prep! You can prepare many of the treats ahead of time, making your party setup a breeze.
Storing Leftovers
- Place any leftover treats in an airtight container.
- Store in a cool, dry place to maintain freshness.
- Enjoy within 3-5 days for best flavor and texture.
Freezing
- It’s best to freeze chocolate-dipped items before assembling the board.
- Wrap each treat individually in plastic wrap, then place them in a freezer-safe bag.
- Freeze for up to 2 months. Thaw at room temperature before serving.
Reheating
- There’s no need to reheat this charcuterie board!
- Simply allow frozen or refrigerated treats to come to room temperature before enjoying.
FAQs
If you have questions about this festive recipe, you’re not alone! Here are some common queries that might help.
What is a Halloween Charcuterie Board?
A Halloween Charcuterie Board is a creative arrangement of themed snacks and treats perfect for Halloween gatherings. It typically includes candy, chocolate-dipped creations, and playful decorations like skeletons.
Can I customize my Halloween Charcuterie Board?
Absolutely! Feel free to swap out any treats based on your preferences or dietary needs. Just keep it fun and festive!
How long does it take to make a Halloween Charcuterie Board?
The preparation time for this Halloween Charcuterie Board is around 120 minutes. Most of that time is spent making the creative snacks!
What other candies can I include in my Halloween Charcuterie Board?
You can add any of your favorite candies such as gummy worms, chocolate eyeballs, or seasonal treats. The sky’s the limit when it comes to customization!
Final Thoughts
Creating this Halloween Charcuterie Board is sure to bring joy and excitement to your festivities! With its vibrant colors and whimsical treats, it’s perfect for both kids and adults alike. I hope you enjoy making this spooky delight as much as I do. Share it with friends and family, and let the compliments roll in! Happy haunting!
Halloween Charcuterie Board
- Prep Time: 30 minutes
- Cook Time: 10 minutes
- Total Time: 40 minutes
- Yield: Serves approximately 12 1x
- Category: Dessert
- Method: No-Cook
- Cuisine: American
Description
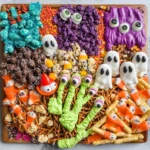
Get ready to elevate your Halloween celebrations with a whimsical Halloween Charcuterie Board! This delightful spread is perfect for parties, cozy movie nights, or festive gatherings, combining an array of colorful candies and creative sweet treats that will enchant both kids and adults alike. From chocolate-dipped Rice Krispie monsters to adorable ghostly cookies, each element adds a playful touch to your table. The best part? This charcuterie board is incredibly easy to assemble and can be tailored to suit any crowd. Grab your favorite candies and let the fun begin!
Ingredients
- 8 rice krispie treats
- 15 ounces white chocolate melting wafers
- purple food dye
- candy eyes
- 8 pretzel rods
- sliced almonds
- 8 Nutter Butter cookies
- 8 Mini Reese's Cups
- 8 Oreo Thins
- 18 ounces Smarties
- 16 ounces red licorice
- 28 ounces sour pectin-based gummy candies
- 40 ounces candy corn
Instructions
- Create Monster Treats by dipping Rice Krispie treats in melted white chocolate mixed with purple food dye. Add candy eyes and sprinkles.
- Prepare Witch Fingers by dipping pretzel rods in green-tinted white chocolate and topping them with sliced almonds.
- Make Ghostly Delights by coating Nutter Butter cookies in melted white chocolate and adding mini chocolate chips for facial features.
- Assemble Batty Bites using Mini Reese's Cups, Oreo cookie halves as wings, and candy eyes.
- Arrange all treats on a serving board with candies filling in the gaps for a colorful display.
Nutrition
- Serving Size: 1 piece (45g)
- Calories: 190
- Sugar: 23g
- Sodium: 55mg
- Fat: 9g
- Saturated Fat: 5g
- Unsaturated Fat: 3g
- Trans Fat: 0g
- Carbohydrates: 29g
- Fiber: 1g
- Protein: 2g
- Cholesterol: 5mg