Graveyard Brownie Bites
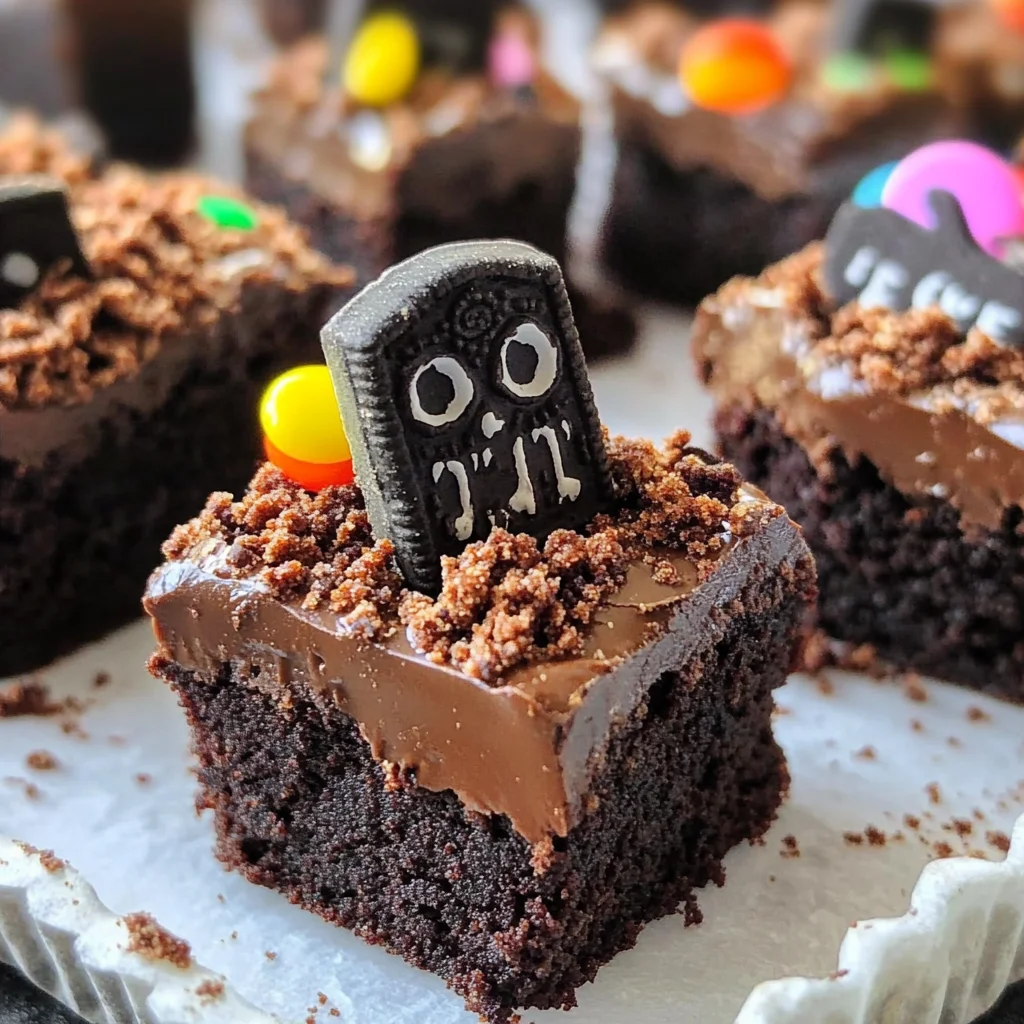
If you’re looking for a fun and spooky treat to impress your guests this Halloween, let me introduce you to my favorite Graveyard Brownie Bites! These delightful little bites are not only delicious but also incredibly easy to make. With store-bought brownie bites as the base, they come together in no time, making them perfect for busy weeknights or festive gatherings. The best part? They add a touch of whimsy to any Halloween party, bringing smiles all around.
I love how versatile these brownie bites can be. Whether you’re hosting a frightful feast or just want to surprise the kids after school, these treats are sure to delight. Plus, they’re a great way to get creative with toppings and candies!
Why You’ll Love This Recipe
- Quick and Easy: This recipe takes just 20 minutes from start to finish, letting you whip up something special without spending hours in the kitchen.
- Family-Friendly Fun: Kids will love helping out with the decorations, making it a wonderful activity for family bonding.
- Perfect for Any Occasion: Whether it’s a Halloween bash or an autumn get-together, these brownie bites are sure to be a hit!
- Customizable Treats: With various candies and toppings available, you can personalize each bite to suit your taste.

Ingredients You’ll Need
These Graveyard Brownie Bites use simple and wholesome ingredients that are easily accessible. Let’s gather what we need:
For the Brownie Bites
- 12 Store Bought Brownie Bites
For the Toppings
- Oreo Crumbs
- 1/2 cup Chocolate Chips
- 1 1/2 tbsp Butter
- 2 tsp Milk
- 2 tsp Corn Syrup
- Graveyard Candies
Variations
This recipe is wonderfully flexible, allowing you to switch things up based on your preferences or what you have on hand. Here are some fun variations:
- Try Different Candies: Swap out graveyard candies for gummy worms or spooky marshmallows for a different look.
- Use Different Cookies: Instead of Oreos, crushed graham crackers or vanilla wafers can provide an interesting twist.
- Go Nutty: Add chopped nuts like almonds or walnuts on top of the ganache for extra crunch and flavor.
- Make It Vegan: Use dairy-free chocolate chips and butter alternatives to create a vegan-friendly version of these brownie bites.
How to Make Graveyard Brownie Bites
Step 1: Prepare the Brownie Base
Start by setting out your 12 brownie bites on a piece of parchment paper. This makes it easy to assemble later without any mess! Keeping them spaced out allows you room to work with the toppings.
Step 2: Create Oreo Crumbs
Next, grab a handful of Oreos and pulse them in a food processor until they turn into fine crumbs. Set these aside. These crumbs will give your brownie bites that classic graveyard look while adding delicious flavor!
Step 3: Make the Ganache
In a microwave-safe bowl, combine your chocolate chips, butter, milk, and corn syrup. Heat it all together for about 30 seconds before stirring until smooth and creamy. This ganache adds richness that perfectly complements the brownies.
Step 4: Assemble Your Treats
Using a spoon, generously dollop some ganache onto each brownie bite. This step is where those delightful flavors begin to meld together!
Step 5: Add Oreo Crumbs
Once the ganache is on top, take those Oreo crumbs and heap them onto each brownie bite. This creates that delicious “dirt” effect that’s so fun for Halloween!
Step 6: Garnish with Candies
Finally, top each brownie bite with your chosen graveyard candies. This is where you can really get creative! Arrange them in funny or spooky ways—let your imagination run wild!
And there you have it—your very own Graveyard Brownie Bites ready to impress! Enjoy every decadent bite!
Pro Tips for Making Graveyard Brownie Bites
Making these Graveyard Brownie Bites is a breeze, and with a few handy tips, you can elevate your Halloween treat game even further!
-
Use quality chocolate chips: Opt for semi-sweet or dark chocolate chips for the ganache. This ensures a rich flavor that pairs perfectly with the sweetness of the brownie bites.
-
Customize your toppings: Feel free to get creative with your graveyard candies! Consider gummy worms, candy pumpkins, or edible eyeballs to make each brownie bite unique and fun.
-
Chill before serving: Allow the ganache to set in the refrigerator for about 10 minutes after assembly. This helps the toppings adhere better and makes them easier to serve.
-
Experiment with layers: For an extra indulgent treat, add a layer of whipped coconut cream under the Oreo crumbs. This gives a delightful texture contrast and enhances the dessert’s overall flavor.
-
Double the recipe for larger gatherings: If you’re hosting a monster mash or a spooky soirée, don’t hesitate to double this recipe. They’re so easy to make that you won’t mind whipping up another batch!
How to Serve Graveyard Brownie Bites
Presentation can turn an ordinary dessert into a showstopper! Here are some fun ideas on how to serve your Graveyard Brownie Bites at your Halloween gathering.
Garnishes
- Edible glitter: A sprinkle of edible glitter on top of the brownie bites can add an enchanting touch and make them sparkle like Halloween magic.
- Candy corn: Scatter some candy corn around the serving plate for a colorful, festive display that complements the graveyard theme.
- Chocolate shavings: Add some chocolate shavings on top of the Oreo crumbs for an extra depth of flavor and an appealing look.
Side Dishes
-
Pumpkin Soup: A warm bowl of creamy pumpkin soup pairs wonderfully with sweet treats. Its savory notes balance out the sweetness of the brownies while keeping things festive.
-
Spooky Cheese Platter: Create a cheese platter featuring sharp cheeses, crackers shaped like spiders or ghosts, and seasonal fruits like apples or pears. It adds variety and appeals to adult guests as well.
-
Fruit Skewers: Assemble skewers with seasonal fruits such as strawberries, grapes, and orange slices. Not only do they provide a refreshing contrast to the richness of brownies, but they’re also easy to eat.
Now that you’re equipped with these pro tips and serving suggestions, it’s time to impress your guests with these delightful Graveyard Brownie Bites. Happy Halloween baking!
Make Ahead and Storage
These Graveyard Brownie Bites are perfect for meal prep, making it easy to whip up a spooky treat ahead of time for your Halloween gatherings!
Storing Leftovers
- Store any leftover brownie bites in an airtight container.
- Keep them at room temperature for up to 3 days.
- If you prefer, you can refrigerate them to extend freshness for another few days.
Freezing
- Place the brownie bites in a single layer on a baking sheet and freeze until solid.
- Once frozen, transfer them to an airtight freezer bag or container.
- They can be stored in the freezer for up to 2 months.
Reheating
- To enjoy your brownie bites warm, simply microwave them for about 10-15 seconds.
- For a more decadent experience, reheat in the oven at 350°F (175°C) for 5 minutes.
FAQs
Have questions about making these delightful Graveyard Brownie Bites? Here are some answers!
Can I use homemade brownie bites instead of store-bought for Graveyard Brownie Bites?
Definitely! If you prefer homemade treats, feel free to use your favorite brownie recipe. Just ensure they are fully cooled before decorating.
How can I make Graveyard Brownie Bites healthier?
You can swap out chocolate chips and butter for dark chocolate and coconut oil. Additionally, consider using lower-sugar candies for decoration.
What types of graveyard candies work best with Graveyard Brownie Bites?
Gummy worms, chocolate tombstones, and candy pumpkins make excellent choices! Let your imagination run wild with whatever spooky candies you find.
Can I prepare Graveyard Brownie Bites the day before a party?
Yes! You can assemble them the night before and store them in an airtight container until your party. They’ll be just as delicious!
Final Thoughts
I hope you enjoy creating these delightful Graveyard Brownie Bites as much as I do! They’re not only fun to make but also bring a festive touch to any Halloween celebration. Don’t hesitate to get creative with your toppings and share this sweet treat with friends and family. Happy baking!

Graveyard Brownie Bites
- Prep Time: 10 minutes
- Cook Time: 10 minutes
- Total Time: 20 minutes
- Yield: Makes approximately 12 servings 1x
- Category: Dessert
- Method: No-bake
- Cuisine: American
Description
Get ready to impress your guests this Halloween with these delightful Graveyard Brownie Bites! These spooky treats are not only incredibly easy to make but also a fun activity to bring the family together. Using store-bought brownie bites as the base, you can whip up these festive desserts in just 20 minutes, making them perfect for busy schedules or last-minute gatherings. Decorate with chocolate ganache, crushed Oreos, and a variety of graveyard-themed candies for a whimsical touch that will have everyone smiling. Whether for a Halloween party or simply as a sweet surprise for the kids, these brownie bites promise deliciousness in every spooky bite.
Ingredients
- 12 Store-Bought Brownie Bites
- Oreo Crumbs
- 1/2 cup Chocolate Chips
- 1 1/2 tbsp Butter
- 2 tsp Milk
- 2 tsp Corn Syrup
- Graveyard Candies (pectin-based gummy candies or vegan marshmallows)
Instructions
- Arrange brownie bites on parchment paper.
- Blend Oreos into fine crumbs; set aside.
- In a microwave-safe bowl, mix chocolate chips, butter, milk, and corn syrup. Heat for 30 seconds and stir until smooth.
- Spoon ganache onto each brownie bite.
- Sprinkle Oreo crumbs over the ganache.
- Top with your choice of graveyard candies; get creative!
Nutrition
- Serving Size: 1 brownie bite (38g)
- Calories: 160
- Sugar: 12g
- Sodium: 50mg
- Fat: 7g
- Saturated Fat: 4g
- Unsaturated Fat: 3g
- Trans Fat: 0g
- Carbohydrates: 22g
- Fiber: 1g
- Protein: 2g
- Cholesterol: 10mg

